
[ad_1]

Earlier, achieving a smooth transition while navigating on the web was challenging. We had to juggle SPA, JavaScript, and CSS, which made compatibility, performance, and accessibility seem unattainable. Thankfully, with the new Native Browser API View Transitions and the Astro implementation, this process is now effortless. Astro takes care of the heavy lifting, reducing the CSS and JavaScript overhead and offering true navigation via Multi Page Application (MPA).
In this guide, we’ll walk through building a basic shop, taking advantage of this technique to ensure smooth transitions between pages.
Getting started
Cloning the GitHub repository
If you’re eager to get started, check out the Github repository.
Step-by-step
Begin by creating an Astro project using its installer. If you encounter any issues or have questions, the Astro Installation Guide has all the answers.
# Using NPM
npm create astro@latest
# Using Yarn
yarn create astro
# Using PNPM
pnpm create astro@latest
During installation, the installer will prompt you for some settings. Choose the Empty project option as your starting point.
Understanding the Folder Structure
- components: This folder contains various components like buttons, cards, etc.
- layouts: Here, we store shared page layouts.
- pages: This folder contains pages, and navigation is based on file-based routing. Discover more about this in the Astro Routing Guide.
Astro supports a variety of UI frameworks such as React, Vue, Svelte, and more. For this demonstration, we’ll use the Astro Syntax to create our components. These files have an .astro extension and combine HTML, CSS, and JS.
Integrating TailwindCSS
We’ll utilize TailwindCSS for styling in this project. Use the Astro CLI to incorporate it:
# Using NPM
npx astro add tailwind
# Using Yarn
yarn astro add tailwind
# Using PNPM
pnpm astro add tailwind
Products Data
For this example, we will be using a data set of Products that contains some sport shoes and shirts, but feel free to use any data you want.
We will place these images in the /publics folder since they are already optimized for the web. By default, Astro will not optimize images in the public’s folder. If you want Astro to optimize them, you should put them in the /src folder or configure it. Learn more about Astro Image Optimization
Add an icon library
In this example, we will use astro-icon for the page icons.
# Using NPM
npm i astro-icon
# Using Yarn
yarn add astro-icon
# Using PNPM
pnpm add astro-icon
Running the project
# Using NPM
npm run dev
# Using Yarn
yarn dev
# Using PNPM
pnpm dev
You’ll see a blank page.
Layout and Design
First, create an overall layout for the pages. It will be located under src/layouts/Layout.astro
Astro defaults render the page statically during build time, so at the top of the page, we see three dashes — that separate the JavaScript that will be executed during build time (or during the request time for SSR, for example) from the rest of the page.
---
import { ViewTransitions } from "astro:transitions";
interface Props {
  title: string;
  description?: string;
}

const {
  title,
  description = "A simple Shop built in Astro using View Transitions and TailwindCSS",
} = Astro.props;
---

<html lang="en">
  <head>
    <meta charset="UTF-8" />
    <meta name="description" content={description} />

    <meta name="viewport" content="width=device-width" />
    <link rel="icon" type="image/svg+xml" href="/favicon.svg" />
    <meta name="generator" content={Astro.generator} />
    <title>{title} - Astro Transitions Shop</title>
    <ViewTransitions />
  </head>
  <body>
    <main
      class="relative max-w-6xl min-h-screen mx-auto py-6 lg:pt-10 px-4 pb-20"
    >
      <slot />
    </main>

    <style is:global>
      :root {
      }
      body {
        background-color: theme(colors.gray.50);
      }
      .animate-in {
        animation: animate-in 0.5s ease-in-out;
      }
      /* Firefox */
      * {
        scrollbar-width: auto;
        scrollbar-color: #c7c7c7 #ededed;
      }

      /* Chrome, Edge, and Safari */
      *::-webkit-scrollbar {
        width: 15px;
      }

      *::-webkit-scrollbar-track {
        background: #ededed;
      }

      *::-webkit-scrollbar-thumb {
        background-color: #c7c7c7;
        border-radius: 5px;
        border: 2px solid #ffffff;
      }
      @keyframes animate-in {
        0% {
          opacity: 0;
          transform: translateY(1rem);
        }
        100% {
          opacity: 1;
          transform: translateY(0);
        }
      }
    </style>
  </body>
</html>
To use View Transitions, we need to import and place the <ViewTransitions /> component within the <head> section of the layout we want to use. Once done, you’ll observe that navigation has adopted a fade effect.
The layout expects the title and description properties from its child elements. However, you can set any properties you desire, such as metadata props, for instance.
We’ve also introduced a <main> tag that will centrally position our page content. The <slot /> tag is where Astro will inject the child components of the layout, similar to the ‘children’ prop in React.
At the bottom, we use the <style is:global> tag to declare global styles shared by this layout. In this example, we’ve defined styles for the browser’s scrollbar and a simple keyframe animation for the title when transitioning to the product page.
The home page
Let’s now create our home page, which will comprise the header and the products list. It can be found at src/pages/index.astro.
---
import Layout from "../layouts/Layout.astro";
import { products } from "../data";
import ProductCard from "../components/ProductCard.astro";
---

<Layout title="Shop">
  <div class="flex gap-3 items-end">
    <h1 class="text-4xl font-bold">Astro Shop</h1>
  </div>
  <h3 class="text-xl text-gray-500">
    Take a look in our products, feel free to buy some
  </h3>
  <div class="flex flex-wrap justify-center sm:justify-normal gap-4 py-8">
    {products.map((product) => <ProductCard {product} />)}
  </div>
</Layout>
We’re importing the <Layout /> component we previously created and assigning a title to it. We’re also extracting products from our products data that was created earlier, and we’ll be using the <ProductCard /> component, which we will create next.
Product Card
The product card is a component designed to display our product in the list. I’ve applied some general styling using Tailwind to ensure the Product Image, Title, Description, and Price are presented correctly.

It is located under src/components/ProductCard.astro.
---
import type { Product } from "../data";

interface Props {
  product: Product;
}

const { product } = Astro.props;
---

<a href={`/product/${product.slug}`} class="block">
  <article
    class="group bg-flex flex-col sm:w-60 w-72 bg-white shadow-sm rounded-lg overflow-hidden hover:shadow-xl hover:shadow-gray-100 transition-all"
  >
    <div class="sm:w-60 w-72 h-60 overflow-hidden">
      <img
        src={product.cover}
        alt={product.name}
        class="object-cover object-center w-full grayscale-[0.1] group-hover:grayscale-0 h-full rounded-md group-hover:scale-105 transition-all"
      />
    </div>
    <div class="p-4">
      <h3
        class="font-semibold truncate"
      >
        {product.name}
      </h3>
      <p
        class="text-gray-600 text-sm truncate"
      >
        {product.description}
      </p>
      <div class="text-right mt-4">
        <span class="font-semibold">${product.price}</span>
      </div>
    </div>
  </article>
</a>
The ProductCard expects a product prop and renders an <article> within an <a> tag for navigation. In Astro, navigation can be simply achieved by using an <a> tag with the href attribute pointing to the desired page.
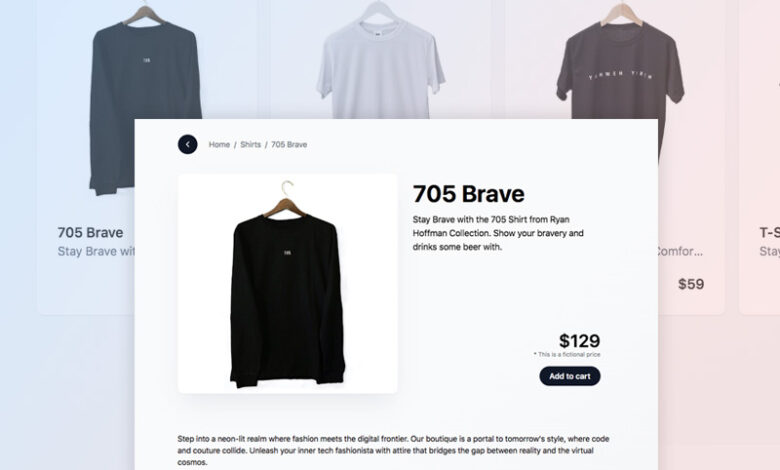
Product Page
The Product page is a dynamic page named [slug] that corresponds to the product’s slug defined in our products data.

The Product page will be located at src/pages/product/[slug]/index.astro.
---
import { type Product, products } from "../../../data";
import Layout from "../../../layouts/Layout.astro";
import ProductCard from "../../../components/ProductCard.astro";
import Icon from "astro-icon";
const { slug } = Astro.params;

export function getStaticPaths() {
  return [
    ...products.map((product) => ({
      params: {
        slug: product.slug,
      },
    })),
  ];
}

const product = products.find((product) => product.slug === slug) as Product;
---

<Layout
  title={product.name}
  description={product.description}
>
  <div class="max-w-5xl mx-auto relative">
    <a
      href="/"
      class="absolute xl:-left-14 top-8 xl:-top-1 xl:bg-none bg-gradient-to-br from-gray-100 rounded p-2 z-10"
      ><Icon name="mdi:chevron-left" class="h-6 w-6" /></a
    >
    <div class="flex gap-2 pb-2 items-center text-gray-500">
      <a class="after:content-['/'] after:pl-2 capitalize" href="/">home</a>
      <span class="after:content-['/'] after:pl-2 capitalize"
        >{product.category}</span
      >
      <span>{product.name}</span>
    </div>
    <div class="flex flex-col md:flex-row sm sm:gap-8">
      <div class="max-w-[450px] w-full h-full max-h-[450px]">
        <img
          src={product.cover}
          alt={product.name}
          class="w-full h-full object-cover rounded-xl shadow-2xl shadow-gray-200 border-b"
        />
      </div>
      <article class="py-4 flex justify-between flex-col">
        <div>
          <h1 class="text-3xl sm:text-5xl font-bold animate-in">
            {product.name}
          </h1>
          <p
            class="max-w-sm py-4 text-lg"
          >
            {product.description}
          </p>
        </div>
        <div class="pt-2 sm:pt-8 text-right">
          <div class="text-3xl font-semibold">
            ${product.price}
          </div>
          <div class="text-xs text-gray-500">* This is a fictional price</div>
          <button
            type="button"
            class="mt-4 px-5 py-2 bg-gray-900 hover:bg-gray-800 text-white font-semibold rounded-full"
            >Add to cart</button
          >
        </div>
      </article>
    </div>
    <div class="py-6 md:py-20 max-w-3xl">
      Lorem ipsum dolor sit, amet consectetur adipisicing elit. Incidunt magnam
      quia, explicabo dolor velit aut omnis natus consequatur possimus fuga illo
      commodi asperiores dignissimos. Consequuntur nam quae commodi quas, magni
    </div>
    <h4 class="font-bold text-lg">Similar products</h4>
    <div class="flex flex-wrap justify-center sm:justify-normal gap-4">
      {
        products
          .filter((p) => p.category === product.category && p.id !== product.id)
          .map((pr) => <ProductCard product={pr} />)
      }
    </div>
  </div>
</Layout>
For this page, we expect the slug prop from the navigation Params and export a function named getStaticPaths. Astro uses this function to generate static pages (SSG) for our website, creating pages for every product in the /products/[slug] format, such as /product/haryo-setyadi-shirt.
In the product title, we use the .animate-in class to animate the title when entering the page. At the bottom, we fetch similar products based on their category.
Note that this example utilizes SSG, so pages are generated at build time. If you need data fetched at request time, you should use SSR. Learn more about SSG and SSR in the Astro Docs.
Implementing View Transitions
We’re now going to implement View Transitions between the pages we’ve created. To do this, we need to add the transition:name attribute to the elements that we want to animate during transitions between pages. Let’s examine our layout in more detail.
- On the home page, each product card features an Image, Title, Description, and Price.
- Similarly, the product page also displays the Image, Title, Description, and Price for each product.
To implement smooth transitions between the two pages, we need to link the elements on both pages using a unique Transition Name. By doing so, Astro’s View Transitions will automatically handle the animations during navigation.
Step 1: Assigning transition:name to Elements in the Product Card
We’ll modify the elements within our Product Card to ensure their transition names align with those on the Product Page.
- src/components/ProductCard.astro
Product Card Image
...
      <img
        src={product.cover}
        alt={product.name}
        transition:name={`${product.slug} image`}
        class="object-cover object-center w-full grayscale-[0.1] group-hover:grayscale-0 h-full rounded-md group-hover:scale-105 transition-all"
      />
...
Product Card Title
...
      <h3
        class="font-semibold truncate"
        transition:name={`${product.slug} title`}
      >
        {product.name}
      </h3>
...
Product Card Description
...
      <p
        class="text-gray-600 text-sm truncate"
        transition:name={`${product.slug} description`}
      >
        {product.description}
      </p>
...
Product Card Price Tag
...
      <div class="text-right mt-4" transition:name={`${product.slug} price`}>
        <span class="font-semibold">${product.price}</span>
      </div>
...
It’s essential to note that we’ve assigned the transition name combining the product’s slug with the name of the element. This ensures that each transition name is unique within the page, allowing Astro to seamlessly link and animate between them during navigation.
Step 2: Link transition:name to Corresponding Elements on the Product Page
Following the same procedure, we’ll associate the appropriate transition names to the relevant elements on this page, ensuring a smooth transition experience.
- /src/pages/product/[slug]/index.astro
Product Page Image
...
        <img
          src={product.cover}
          alt={product.name}
          class="w-full h-full object-cover rounded-xl shadow-2xl shadow-gray-200 border-b"
          transition:name={`${slug} image`}
        />
...
Product Page Title
...
          <h1 class="text-3xl sm:text-5xl font-bold animate-in">
            {product.name}
          </h1>
          <div transition:name={`${slug} title`}></div>
...
It’s worth noting that we assigned the transition name to a <div> adjacent to the <h1> title element rather than to the title itself. At times, View Transitions can exhibit unusual slide behaviors with larger title elements like <h1>. By assigning it to a neighboring element, we ensure a smoother transition for the product card title. This workaround addresses current limitations, which may be addressed in future updates.
Product Page Description
...
          <p
            class="max-w-sm py-4 text-lg"
            transition:name={`${slug} description`}
          >
            {product.description}
          </p>
...
Product Page Price
...
          <div class="text-3xl font-semibold" transition:name={`${slug} price`}>
            ${product.price}
          </div>
...
We’ve used consistent transition names, ensuring they reference the corresponding components for a seamless transition.
And just like that, it’s done! Upon navigation, you’ll now experience a captivating slide animation between the pages.
Browser Support and Accessibility
View Transitions remains an experimental feature and does not enjoy widespread support yet. For a comprehensive understanding, review the browser compatibility chart.
Astro provides a fallback for browsers that lack support for this feature, and it also respects the prefers-reduced-motion setting.
Astro defaults to a fallback animation for unsupported browsers. If you observe unusual behavior in these environments, you might consider deactivating the fallback.
For more information about customizing the animation and configuring the fallback see the Astro View Transitions Documentation
Design Choices for View Transitions
On mobile devices, transitions often appear more subtle due to the limited screen size. Conversely, on larger screens, animations can come across as exaggerated or overly intense, which may lead to a compromised user experience. A good design approach is to simplify and enlarge elements, as demonstrated in this example. Thus, it’s essential that your View Transitions align with your design choices.
The Astro team is actively working to refine these transitions and provide greater control over animations.
Performance
Another crucial aspect to consider is performance. While web browsers continually optimize for better performance, it’s essential to profile your website to identify and address any excessive animations.

Final Considerations
View Transitions, combined with Astro integration, are undeniably impressive. However, careful consideration is required before deploying them in production apps. The appropriateness of using View Transitions hinges on the nature of your application and its target users. For instance, if your page has a complex UI, this feature might not be the best fit. Nevertheless, View Transitions hold vast potential for enhancing the user experience on numerous websites.
[ad_2]